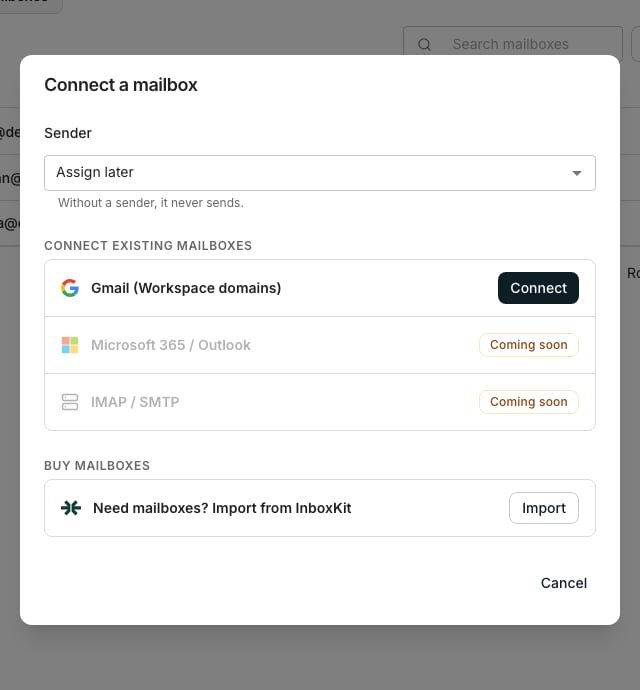
The Connect a mailbox dialog.
Connect a mailbox
1
Open the connect dialog
On the Mailboxes tab, click Connect mailbox.
2
Pick a sender
Pick who this mailbox sends as in the Sender field. Leave it on Assign later to decide afterwards.
3
Pick a connection method
Under Connect existing mailboxes, click Connect on Gmail (Workspace domains). Microsoft 365 / Outlook and IMAP / SMTP are marked Coming soon.
4
Authorize the account
Pick the account you send from and approve the requested access, which covers sending and reading replies. You come back to the dashboard with the mailbox added.
Only Gmail on a Workspace domain connects today. Your admin may need to allowlist Oneprofile first, and the dialog links to Google’s own admin guide for that.
See what you have connected
The Mailboxes tab lists every connected email account, its health, and its daily sending limits. Search it, or narrow it by status, provider and activity with the filters beside the search box. A mailbox that cannot send reads Disconnected in Status, and its row menu offers Reconnect.Import mailboxes in bulk
If you buy dedicated cold-email mailboxes from InboxKit, connect them all at once instead of one at a time. Click Import from InboxKit on the Mailboxes tab, or Import in the connect dialog’s Buy mailboxes section. If your workspace has not connected InboxKit yet, the dialog asks for your API key first.Good to know
How do I choose which mailboxes to import?
How do I choose which mailboxes to import?
The import dialog lists every mailbox in your InboxKit workspace as a searchable table, with each row’s domain and status. Until authorization starts, a row reads Not authorized. From there it moves through Authorizing to Authorized or Failed, and shows Imported once it is connected.Tick the mailboxes you want, set a Daily send limit if you do not want the default, then click Import. The button counts your selection before you click it. Leave the limit blank to use the default.
A newly bought domain can take a few minutes to authorize. A banner on the Mailboxes tab tracks how many have imported so far, even after you close the dialog. Its View progress button reopens the dialog.
How do I see which mailboxes need attention?
How do I see which mailboxes need attention?
- Status reads Disconnected when the mailbox cannot send until you reconnect it
- An empty Sender means nobody sends from this mailbox until you add it to a sender
- Bounce rate shows how often its mail bounces, so open the mailbox to see which recipients broke
What happens when a mailbox disconnects?
What happens when a mailbox disconnects?
A disconnected mailbox sends nothing, and the contacts it emailed wait for it rather than move to another mailbox. A sequence pauses only when none of its mailboxes or LinkedIn accounts can send. A warning banner appears at the top of the tab the moment one drops, and its Show them button filters the list down to them.
Next steps
Senders
Group mailboxes into the profile a sequence sends as.
Build a sequence
Send outreach from the mailboxes you just connected.