> ## Documentation Index
> Fetch the complete documentation index at: https://docs.getoneprofile.ai/llms.txt
> Use this file to discover all available pages before exploring further.
# Import from a tool
> Add rows from a tool you already use. Pick an integration and an object, check the sample rows, then choose which fields become columns.
Bring contacts or companies in from a tool you already use. Oneprofile shows you real sample rows first, so you can see what comes back before you make the table.
 ## Add rows from a connected tool
On **Tables**, choose the **Import from a connected tool** card. You can also click **New** and pick the same item.
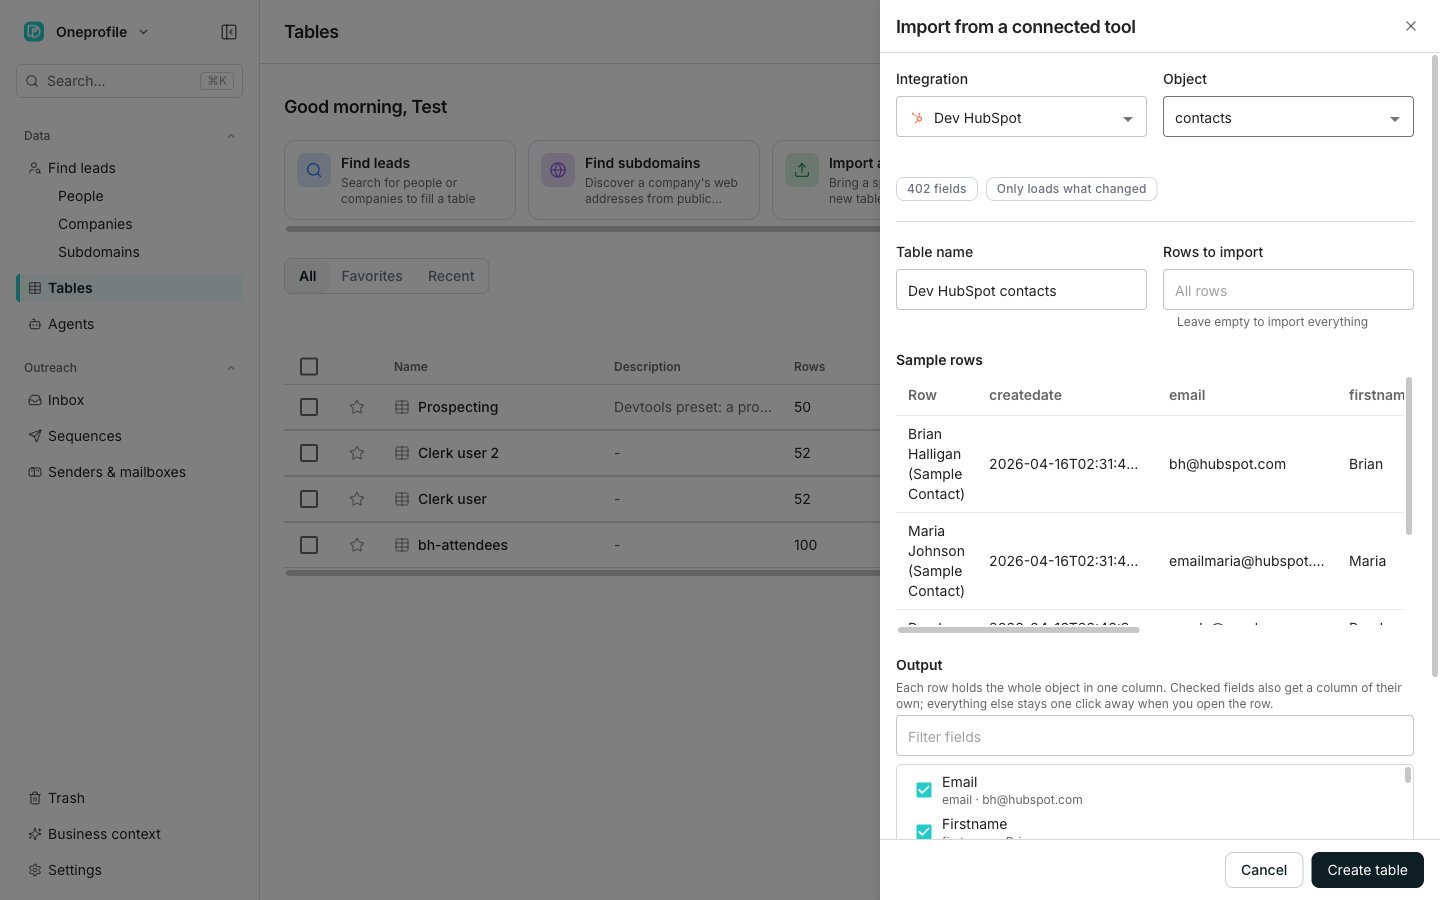
Choose an **Integration**, then an **Object** to bring in, such as contacts or companies.
Oneprofile pulls a few real rows from that object and lists them under **Sample rows**. Every tool means something different by "contact", so this is worth a look.
**Table name** is filled in from the integration and the object. Leave **Rows to import** empty to bring in everything.
Under **Output**, check any field you want as its own column. A line underneath counts how many of them will become columns.
Click **Create table**.
Every row keeps the whole object either way. A field you left unchecked is one click from becoming a column later, straight from the row.
A [CSV import](/find-leads/import-a-csv) is a one-off. This table keeps a link to the tool it came from. That is why the drawer refuses an object with no stable identifier: a later refresh could not tell which row to update.
If nothing is connected yet, the drawer shows **Connect a source** instead. Search the directory and connect from there, without leaving the drawer.
## Good to know
Each row holds the whole object in one column. Checked fields also get a column of their own, and everything else stays one click away when you open the row.
Oneprofile suggests a few fields and lists them first, already checked. Change them freely. A long field list gets a **Filter fields** box above it, and the line under the list reads how many of the fields become columns.
Once the sample rows arrive, a chip says how this object reloads. **Only loads what changed** means later runs bring in just the differences. **Reloads everything each time** means they bring in the whole object again.
A second chip counts the fields the object carries.
Some objects carry no stable identifier. The drawer says so and blocks the import, because a refresh could not tell which row to update. Pick a different object.
The drawer only lists tools it can pull rows from, so a connection of another kind never appears. It tells you when that has happened: "Your new connection can't be imported from yet, so it isn't listed here."
## Next steps
Browse the directory and connect a tool.
Add columns that fill themselves in.
## Add rows from a connected tool
On **Tables**, choose the **Import from a connected tool** card. You can also click **New** and pick the same item.
Choose an **Integration**, then an **Object** to bring in, such as contacts or companies.
Oneprofile pulls a few real rows from that object and lists them under **Sample rows**. Every tool means something different by "contact", so this is worth a look.
**Table name** is filled in from the integration and the object. Leave **Rows to import** empty to bring in everything.
Under **Output**, check any field you want as its own column. A line underneath counts how many of them will become columns.
Click **Create table**.
Every row keeps the whole object either way. A field you left unchecked is one click from becoming a column later, straight from the row.
A [CSV import](/find-leads/import-a-csv) is a one-off. This table keeps a link to the tool it came from. That is why the drawer refuses an object with no stable identifier: a later refresh could not tell which row to update.
If nothing is connected yet, the drawer shows **Connect a source** instead. Search the directory and connect from there, without leaving the drawer.
## Good to know
Each row holds the whole object in one column. Checked fields also get a column of their own, and everything else stays one click away when you open the row.
Oneprofile suggests a few fields and lists them first, already checked. Change them freely. A long field list gets a **Filter fields** box above it, and the line under the list reads how many of the fields become columns.
Once the sample rows arrive, a chip says how this object reloads. **Only loads what changed** means later runs bring in just the differences. **Reloads everything each time** means they bring in the whole object again.
A second chip counts the fields the object carries.
Some objects carry no stable identifier. The drawer says so and blocks the import, because a refresh could not tell which row to update. Pick a different object.
The drawer only lists tools it can pull rows from, so a connection of another kind never appears. It tells you when that has happened: "Your new connection can't be imported from yet, so it isn't listed here."
## Next steps
Browse the directory and connect a tool.
Add columns that fill themselves in.