> ## Documentation Index
> Fetch the complete documentation index at: https://docs.getoneprofile.ai/llms.txt
> Use this file to discover all available pages before exploring further.
# Find people and companies
> Search with filters, watch the match count for free, then pick what to fill in before Oneprofile adds the rows.
Find leads turns a set of filters into a table of people or companies. Counting is free, so you can shape the search first and only spend once you like what you see.
 ## Search for people or companies
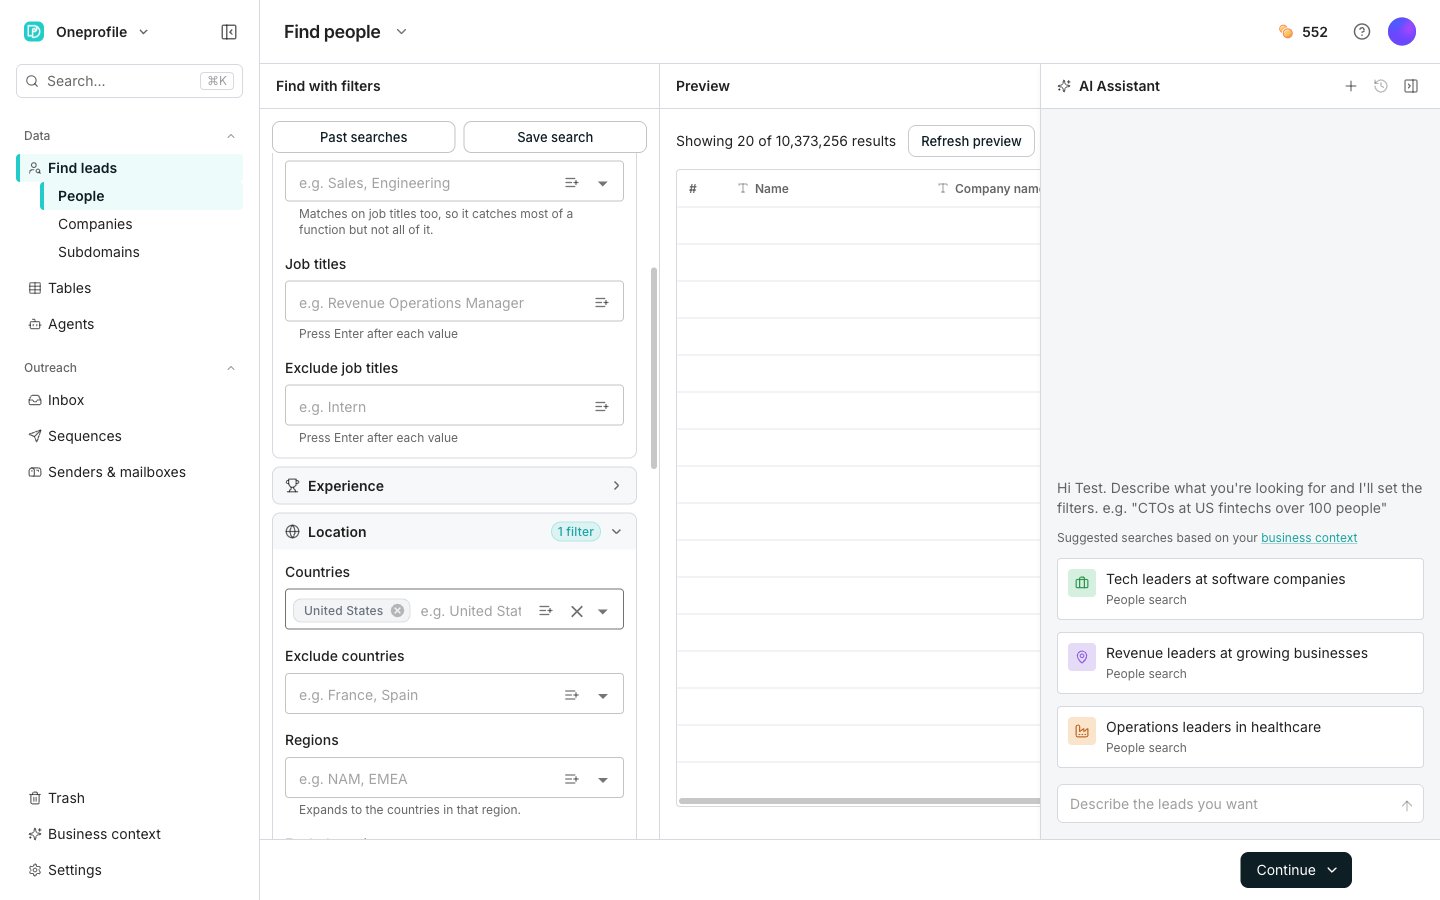
The page opens on **Find people**. Click the arrow next to the page title to switch to **Find companies**.
Add filters in the **Find with filters** pane. The match count updates as you go, and counting costs nothing.
Click **Refresh preview** to pull a small sample of the real rows. The sample is paid, so it waits until you stop editing.
Click **Continue**, then choose **Save to a new table** or **Save to an existing table**.
**Save to an existing table** opens a list of your tables. Pick one, then click **Add rows to this table**. That table's columns decide what runs on the new rows.
**Save to a new table** opens the enrich step below.
## Pick enrichments and see the cost
The **Enrich these rows** panel lists what Oneprofile can fill in, such as an email address or a phone number. Each option carries a cost per row. One is ticked already, because a new table needs at least one.
The panel totals the cost as you tick options and shows your balance beside it. You only pay for rows Oneprofile actually fills in, so the total is the most it can cost.
If your balance is too low, the panel says so. You still get every row, and filling in the extra columns stops once your credits run out.
Click **Create table with N rows**, which names the exact number you are about to add. Oneprofile creates the table and starts filling in what you picked.
## Good to know
The arrow next to the page title also lists **Find subdomains**. That one searches a company domain instead of filters.
Filters you already set carry over when you switch between **Find people** and **Find companies**.
**Find people** groups its filters into **Company attributes**, **Growth**, **Job title**, **Experience**, **Location**, **Professional bio**, **Languages**, **Education**, **Companies**, and **Past experiences**. Each section is one question about the people you want.
**Company attributes** holds Industries and **Job title** holds Seniority. **Growth** holds Headcount growth window with options such as Past 12 months. **Experience** holds Years of experience.
**Location** holds Countries such as United States or Canada. **Professional bio** holds Keyword. That field searches the whole profile rather than only the bio.
**Find companies** uses the same section names where they apply: **Company attributes**, **Growth**, **Location**, **Professional bio**, and **Companies**. Most sections also carry an exclude field, so you can leave people or companies out of a search.
The **AI Assistant** panel sits to the right of the preview. Type into the **Describe the leads you want** box and it sets the filters for you, for example "CTOs at German fintechs over 100 people".
The assistant highlights the fields it just changed, so you can see its work before you run anything.
The preview says "No results found. Try removing or loosening a filter. The search matches nothing as configured." Nothing is charged for a search that matches nothing, because the free count runs before the paid sample.
Click the credit balance in the top bar. **View usage** always shows.
A paid workspace also gets **Manage plan** and **Buy credits**. A free workspace gets **Upgrade** instead.
## Next steps
Get the web addresses underneath a company's domain.
Add columns that fill themselves in.
See what a run costs and buy more credits.
## Search for people or companies
The page opens on **Find people**. Click the arrow next to the page title to switch to **Find companies**.
Add filters in the **Find with filters** pane. The match count updates as you go, and counting costs nothing.
Click **Refresh preview** to pull a small sample of the real rows. The sample is paid, so it waits until you stop editing.
Click **Continue**, then choose **Save to a new table** or **Save to an existing table**.
**Save to an existing table** opens a list of your tables. Pick one, then click **Add rows to this table**. That table's columns decide what runs on the new rows.
**Save to a new table** opens the enrich step below.
## Pick enrichments and see the cost
The **Enrich these rows** panel lists what Oneprofile can fill in, such as an email address or a phone number. Each option carries a cost per row. One is ticked already, because a new table needs at least one.
The panel totals the cost as you tick options and shows your balance beside it. You only pay for rows Oneprofile actually fills in, so the total is the most it can cost.
If your balance is too low, the panel says so. You still get every row, and filling in the extra columns stops once your credits run out.
Click **Create table with N rows**, which names the exact number you are about to add. Oneprofile creates the table and starts filling in what you picked.
## Good to know
The arrow next to the page title also lists **Find subdomains**. That one searches a company domain instead of filters.
Filters you already set carry over when you switch between **Find people** and **Find companies**.
**Find people** groups its filters into **Company attributes**, **Growth**, **Job title**, **Experience**, **Location**, **Professional bio**, **Languages**, **Education**, **Companies**, and **Past experiences**. Each section is one question about the people you want.
**Company attributes** holds Industries and **Job title** holds Seniority. **Growth** holds Headcount growth window with options such as Past 12 months. **Experience** holds Years of experience.
**Location** holds Countries such as United States or Canada. **Professional bio** holds Keyword. That field searches the whole profile rather than only the bio.
**Find companies** uses the same section names where they apply: **Company attributes**, **Growth**, **Location**, **Professional bio**, and **Companies**. Most sections also carry an exclude field, so you can leave people or companies out of a search.
The **AI Assistant** panel sits to the right of the preview. Type into the **Describe the leads you want** box and it sets the filters for you, for example "CTOs at German fintechs over 100 people".
The assistant highlights the fields it just changed, so you can see its work before you run anything.
The preview says "No results found. Try removing or loosening a filter. The search matches nothing as configured." Nothing is charged for a search that matches nothing, because the free count runs before the paid sample.
Click the credit balance in the top bar. **View usage** always shows.
A paid workspace also gets **Manage plan** and **Buy credits**. A free workspace gets **Upgrade** instead.
## Next steps
Get the web addresses underneath a company's domain.
Add columns that fill themselves in.
See what a run costs and buy more credits.