> ## Documentation Index
> Fetch the complete documentation index at: https://docs.getoneprofile.ai/llms.txt
> Use this file to discover all available pages before exploring further.
# AI agent columns
> Add a column that runs a prompt on every row, reads your other columns, and writes back one or more fields.
An AI agent column runs a prompt against each row and writes the result into one or more fields. Use it where an enrichment or a function cannot help: research a company, classify a lead, or say why it fits.
 ## Add an agent column
Click **Tools** in the toolbar, then the **Agent** tab. Click **Use AI** at the top of **Your agents** to write a new prompt from scratch.
The editor opens on an **AI Assistant** card asking what this column should find or write. Describe what you want and click **Generate**, or click **Set up manually** to fill in the fields yourself.
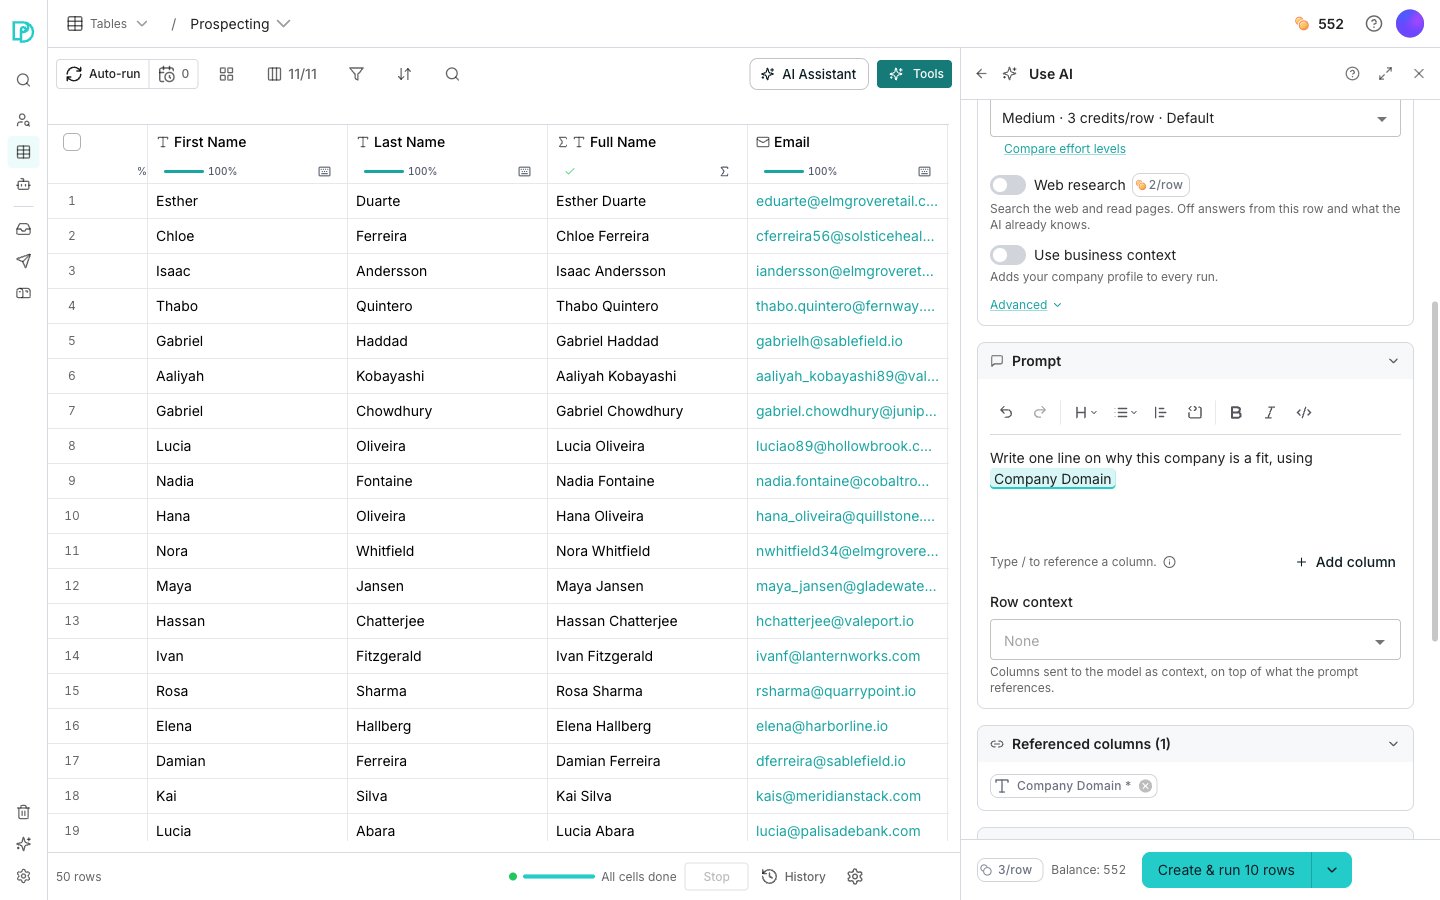
The **Effort** card sets which model the column runs on, and each option shows its cost per row. Turn on **Web research** to let the agent search the web, and **Use business context** to add your company profile to every run.
In the **Prompt** card, type `/` to reference another column's value, for example "Write a one-line summary of /Company". **Add column** under the prompt inserts a reference without typing.
In the **Outputs** card, pick **Fields** to list what comes back, each with its own name and type. Each field becomes its own column once the agent runs.
Click **Preview on 3 rows** to run the column on the table's first three rows for free. Then use the split button for **Create & run 10 rows**, **Create & run 50 rows**, or **Create and don't run**.
## Build an agent you can reuse
The **Agents** page is where you build agents to deploy on any table. It is one page with three sections: **Build an agent**, **Or start with a template** and **Browse agents**.
Describe the agent under **Build an agent** and click **Generate**, or click **Set up manually** to start from empty fields. **Built-in templates** opens every agent Oneprofile ships, plus the ones your team has saved.
## Good to know
**Your agents** comes first: **Use AI**, the blank prompt you write on the spot, then any agent you have saved. **Built-in agents** sits under it, ready to run without writing a prompt.
Arrow keys move through the picker, and the right arrow drills into a column that holds several fields or list items. Click a pill to mark that reference required, so a row is skipped when the value is missing. Press Backspace to remove one.
**Compare effort levels** in the **Effort** card opens the full trade-off between the models. The **Advanced** disclosure below it sets a **Starting URL column** the research begins from, and can keep the agent on that domain.
Click **Add output** for another field, and **Add description** to explain one to the model. A description is worth writing when the field name alone could be read two ways.
**JSON Schema** in the **Outputs** card replaces the field list with a raw schema you write yourself.
**Preview on 3 rows** is free, within a daily allowance for your workspace. When the allowance runs out, the preview tells you so instead of running.
A column deployed from a saved agent stays linked to it. Its banner names the agent and tells you to open the agent to change the prompt, effort, output or tools.
The **Quick set-up** tab stays editable, so you can still remap which table columns feed the agent's inputs. Click **Stop using this agent** on the banner to keep a copy of its settings on the column instead.
Preview stays available on a linked column. Previewing spends nothing and changes nothing.
## Next steps
Fill a column from the catalog instead of a prompt.
Control what runs, when, and over which rows.
## Add an agent column
Click **Tools** in the toolbar, then the **Agent** tab. Click **Use AI** at the top of **Your agents** to write a new prompt from scratch.
The editor opens on an **AI Assistant** card asking what this column should find or write. Describe what you want and click **Generate**, or click **Set up manually** to fill in the fields yourself.
The **Effort** card sets which model the column runs on, and each option shows its cost per row. Turn on **Web research** to let the agent search the web, and **Use business context** to add your company profile to every run.
In the **Prompt** card, type `/` to reference another column's value, for example "Write a one-line summary of /Company". **Add column** under the prompt inserts a reference without typing.
In the **Outputs** card, pick **Fields** to list what comes back, each with its own name and type. Each field becomes its own column once the agent runs.
Click **Preview on 3 rows** to run the column on the table's first three rows for free. Then use the split button for **Create & run 10 rows**, **Create & run 50 rows**, or **Create and don't run**.
## Build an agent you can reuse
The **Agents** page is where you build agents to deploy on any table. It is one page with three sections: **Build an agent**, **Or start with a template** and **Browse agents**.
Describe the agent under **Build an agent** and click **Generate**, or click **Set up manually** to start from empty fields. **Built-in templates** opens every agent Oneprofile ships, plus the ones your team has saved.
## Good to know
**Your agents** comes first: **Use AI**, the blank prompt you write on the spot, then any agent you have saved. **Built-in agents** sits under it, ready to run without writing a prompt.
Arrow keys move through the picker, and the right arrow drills into a column that holds several fields or list items. Click a pill to mark that reference required, so a row is skipped when the value is missing. Press Backspace to remove one.
**Compare effort levels** in the **Effort** card opens the full trade-off between the models. The **Advanced** disclosure below it sets a **Starting URL column** the research begins from, and can keep the agent on that domain.
Click **Add output** for another field, and **Add description** to explain one to the model. A description is worth writing when the field name alone could be read two ways.
**JSON Schema** in the **Outputs** card replaces the field list with a raw schema you write yourself.
**Preview on 3 rows** is free, within a daily allowance for your workspace. When the allowance runs out, the preview tells you so instead of running.
A column deployed from a saved agent stays linked to it. Its banner names the agent and tells you to open the agent to change the prompt, effort, output or tools.
The **Quick set-up** tab stays editable, so you can still remap which table columns feed the agent's inputs. Click **Stop using this agent** on the banner to keep a copy of its settings on the column instead.
Preview stays available on a linked column. Previewing spends nothing and changes nothing.
## Next steps
Fill a column from the catalog instead of a prompt.
Control what runs, when, and over which rows.